Showing posts with label home improvement. Show all posts

Friday, November 24, 2017

Today's DIY Art Project - Light-Up 2D Christmas Tree

Here's a project I created last year for our new house, a flat Christmas tree to hang on the wall.  Here's the supplies and tools I used:


Parts:

  • Three-foot long pieces of doweling (x3)
  • Small bolts (x5)
  • Wingnuts (x5)
  • Small piece of chain
  • Small cuphooks (many)
  • Christmas lights (not pictured above)
  • Kitkat
Chain is usually sold in 1' sections.  Get the size you need and when you get to the front and they try to hassle you, just tell them what the price was for the full 1' section.  

Tools:
  • Drill, drillbit
  • Saw
  • Vice or clamp
  • Eye protection


Here's what was left over when all was said and done - one bolt and wingnut, a bunch of cuphooks and a small section of doweling.  If I were doing this project this year, I'd go to Lowes instead as me and this company have had a falling out over the political comments of their CEO.  I sold my stock and stopped shopping there.


Basically, lay out the tree shape.  Add about eight inches to the base.  Cut off the excess.  Then cut the piece in half.


Drill holes into all of the pieces at the ends.  For the bottom pieces, overlap by 3-4 inches and drill a second set of holes.  You're going to overlap the bottom piece of the frame for two reasons: you can remove one bolt and fold up the tree if you want, plus you need to make up for the thickness of the doweling as I'll explain in the next step.


Begin fitting together.  The left pole goes on top of the right pole and bottom pole.  The chain goes between the two poles at the top.  Insert the bolt and secure with a wingnut.  Because your bottom pole is in two pieces stacked together, it goes above the right pole on the right side.


The basic tree.


Hanging on the house.


Finally, add lights.


Friday, August 01, 2014

The Sift (Aug. 1, 2014)

Happy Friday - here's 5 articles that I thought were cool.

ENGADGET -- A 1,000-foot high wall might be the key to saving the midwest from tornados - Darn it, I knew I should have copyrighted that idea when I had it years ago.

HOUZZ -- How to Add a Backyard Shed for Storage or Living - just so we're clear, internet, I still haven't forgiven you for not telling me about this site sooner

KITEBRICKS -- Kite Bricks - they call it a new way to build, but I was creating buildings and space ships and cars when I was a kid. In fact, wasn't there a movie about this kind of building process earlier this year? (Oh.. wait.. these are full size Legos? Well, then that's completely different.) Either way, this is interesting - very little waste and probably a very fast method of construction. Check out the video.


SETH GODIN -- When in doubt, re-read rule one - hint: rule 1 is the customer is always right. It's a little myopic (he probably doesn't read Not Always Right but it's still a good thought.

BAKER -- Case Study: Wrigley 5 Gum - as a fan of this gum, I thought this was a really cool read - how they took it from ideation to execution, complete with a progression of designs and themes.

Sunday, June 08, 2014

How to: Replace the heating element in your oven

Our trusty stove recently stopped stoving and transformed into another pantry. While we really could use the space, but really, we needed it to pre-heat, heat, bake, broil and all that kind of good stuff. As near as we could tell, it was new when we moved in.


Well, it was heating, but only a little bit and Lori had what looked like a fire or a sparkler. Yep, look at that, the heating element had failed. So, time to Google. The heating element is metal tube that contains insulation and a wire. Electricity is applied to the wire, encounters resistance and heats up.

Eventually the insulation may wear out and the internal wire will touch the outer tube and cause a short. There may be a brief flare-up that often looks like a sparkler.

Sure enough, there it is. (Click on any photo to enlarge.)


A little more research and found a video on how to do the repair.   (Why do a blog post if there are videos out there? Two reasons - first, they didn't show close-ups. Second, those guys were pros. I'm not. If I can do it, you can do it.)

They also offered to sell the part. Unfortunately, they wanted $40 + s/h.  So...

Thursday, December 05, 2013

IKEA Assembly Tip #lifehacker

If you find yourself assembling furniture with a tiny double-sided allen-wrench like the ones that come with IKEA products, here's a handy tip that will make the work go quicker... until you get to the last bolt.

Take a bolt and place it on the other end of the wrench and that'll give you extra leverage.


Thursday, August 15, 2013

I'm So Blue I Don't Know What To Do

This is just disappointing. The is the blue tape that Rachel and I put on Ben's wall. Rachel noticed it was starting to sag an hour or two after we'd hung it so she carefully worked to set it again. And then a few hours later, I saw that it was loose again and so I went back over all of it with a second strip, offset, to hopefully adhere it better to the wall.


And yet the next morning it was all on the floor. It's going to be difficult for me to get in and get the strip on Ben's wall painted (with multiple coatS) with my schedule so I need something that will stay for days or a week or more. Scotch Brand Blue Painters tape by 3M used to do that. This stuff which is even printed with "3M" every few inches on the front of the tape (Rachel: "Why are they advertising on their tape?") is garbage. So disappointed.

Tuesday, May 21, 2013

Plumbing Leak

The other morning Rachel noticed water on the floor in the laundry room in front of the washing machine. I looked up and saw a small wet spot in the ceiling about the size of a half dollar.

I pressed at it and it was definitely wet.  I cut a small hole and found the center of the hole was a screw holding the drywall. I cut until all of the wet drywall was removed. The beam was wet and I'm sure the insulation will also be wet.

Through trial and error, I narrowed it down to the master bathroom toilet. Yes, the master bathroom, the one we had to bring down to the studs, replacing the shower, subfloor, reinforce the joists and replace the insulation and drywall underneath. Guess I can at least be glad I hadn't gotten around to repainting it - it's a pain, it's up 12 feet.

So, we have someone coming today to see if the leak can be stopped quickly or if we have a bigger problem on our hands.

Sigh. Will we ever get a break?


Wednesday, January 23, 2013

in your face

Our department does all things digital for the organization... website, email, social, advertising, SEO, you name it. We're situated right next to another group that handles mostly print. One might ask why we're siloed by medium, but that's another topic for another day on someone else's blog.

(click to enlarge)
There are three ways to access our department. One of them involves going past a wall of signs extolling the virtues of print. I find it insulting but I'm told (by someone on our team who we hired away from that team) that its placement makes sense considering who sits on the other side of the wall. I don't know what that means, but whatever.

I really want to add two of my own:

"Print is permament."

and

"Print is hack-proof."
(And then scribbled across it "if you don't have a Sharpie.")

I feel like I'm almost creative enough to do them in such a way that they could stay up for days or weeks without people noticing but I feel like that would ultimately annoy the wrong people who might make things unpleasant for me by way of a meeting with my boss where he tells me to knock it off.

I'd probably have better luck making signs for the Home Depot sheds like "Not intended for use as a residence" or "Guaranteed Ghost-Free for Three Years"

Sunday, September 09, 2012

If you give a mouse a cookie...

Mom and dad stayed overnight at our house with the children last weekend while Lori and I snuck away to L.A. for a very brief getaway.  Upon our return, I asked my parents "If this were your house, what's the first thing you'd work on?"  They pointed to the moss on the back deck.  I hadn't really noticed it, but they said that, untreated, it would destroy the deck.

Today I cleared everything off the deck and then ran a screwdriver between each board to loosen the moss. Of course, it also loosened some paint.  And there were plenty of places where the paint was already coming up.  I suppose I shouldn't be surprised - it has been at least six years since the deck was painted and while they did a really nice job flipping the house inside, I'm not sure they were as well versed in what to do outside, judging by some of the other places where the house needs repainting and by some of the shrubs that were planted inappropriately close the edge of the sidewalk and grew to intrude.  (Some we've removed, some are still waiting for us to remove them, but I trim them back regularly, but that makes them look bad.)

So, scraped loose paint, used a push broom, even my favorite tool, the leaf-blower - that was really great at blowing away paint that wasn't adhering to the deck at all.

Of course, then that meant getting out a hammer and nailing the deck boards back in.

Next will probably be sanding, and then repainting.

Oh, and the rainy season is supposed to start tomorrow at 11 am.  I suspect at some point we'll tarp it off and then I'll take a day off from work and Lori and I can paint.

Thursday, December 08, 2011

While You're Up There...

A clever bit of impulse purchase suggestion going on here from The Home Depot.  Nestled amongst all the Christmas lights is an entire row of Moss-B-Ware.  I have to admit to having purchased that in the past even though I it wasn't on my list.  Must be some good mark-up on that stuff.


Thursday, January 27, 2011

How To: Fix a "TE Error" on an LG-WM2277HW (part 1 of 2)

Last November, we noticed that the drywall ceiling in our laundry room was bowing, as if there was water pushing down on it. The sky was literally falling. Or at least literally about to fall. As if that wasn't enough, the very next day, the washing machine threw a "tE error."  (So this is about the error, not the stupid ceiling.)
LG-WM2277HW
Washing Machine
The LG-WM2277HW is a rather nice front-loading electric washing machine from LG, but it's a fancy computerized deal, so things like this can be kinda scary. When we first got it, it would often throw some other error, but it turned out that it was because I was spinning the drum after emptying a load. When I'd do that, the machine would turn on. Thought that was pretty cool. Well, it wasn't.

So, yeah, turning the thing now would get me a "tE" flashing on the screen. Now, this was a rather expensive washing machine no longer under warranty and we had laundry to do and we didn't know how long until the ceiling was going to collapse. (By that evening we were pretty sure there wasn't several gallons of water up there, but the ceiling was obviously waterlogged.)

I have manuals for all of our appliances saved on the computer, so I went upstairs to look up the error. It said that there was a problem with the thermistor. To this day, I've never bothered to find out what a thermistor is. But, the more I looked on Google, the more cases I came across where someone got the tE error simply by moving the washing machine or by running a really heavy lopsided load. The thermistor wasn't failing, a wire was being knocked loose. Sounds to me like a manufacturing defect.

My wife, who has incredible faith in me -- or hadn't seen the instructions that I'd seen (copied below) encouraged me into trying to repair the thing itself.

The instructions I found:
To be more specific, unplug unit. Behind the machine are two plastic kick plates, remove to slide off the top. Once off, two top self tap metal screws and one screw behind panel wall, remove. Remove two detergent screws. Lift electrical panel and set on top of machine. Remove four top screws. Bottom drain has one screw in front, take out plastic cover and one screw in back. Take off rubber by opening door. With a screw driver, prey and lift up the brass spring ring and remove. Then the front panel should slide up and out. Be careful because electric wire is still connected, move to the side of unit. You will then be able to find the thermostat. Unplug and replace, you will need to use the same rubber bushing. Took me an hour, I’m not an appliance repair guy.
Good enough?  I was able to get the job done, but it left a lot to be desired.   So, I decided to document the job myself, in case that helped.  And due to my own stupidity, I did part of the job twice -- I wanted a photo of the error itself but had forgotten to take one.  I thought I had an easy way to get to the error, but I actually rebroke the broken part.   Also, I didn't take photos until I was reassembling, so I had to rearrange them all.  I think I have them all in order and I captured all of the relevant parts.  And yes, this is the kind of thing that voids warranties, but maybe it will save someone the cost of having some guy come out for what's a pretty dumb little engineering defect.

The dreaded "tE Error"
The tools I used: standard screwdriver, flashlight, utility knife, electrical tape, pliers, small screwdriver
Word of caution: Not only does this void your warranty, the metal edges are very sharp.  I got one tiny cut and I think I was very lucky that this was the only injury I received.  They wear safety gloves, vests, pants and eye protection when assembling these things.
Step 1 - Ok, here we go.  The lid is attached by two plastic "kick plates" on the back.  Each plate has two screws.


Saturday, December 18, 2010

When You're Here, You're Family

Argh.  It ate it a second time.  Ok, third time is extremely brief.  I wonder if it's the photo that's the problem.

Ok, super-quick summary.

Power was out at Home Depot.  Instead of sending all their employees home and closing the store (and possibly not paying the employees) and frustrating the customers, they opened the store anyhow.  They could only take credit and debit (do people still use checks and cash?  Stop it!) and for what I assume were liability and loss-prevention reasons, they provided each customer with an escort.   I liked that - it was like having a personal shopping assistant.  They helped me find things quicker, and even engaged area specialists on my behalf, preventing me from buying the wrong product (they gave me what I asked for, but then gave me enough instruction on how to use it that I realized I was asking for the wrong thing).

Checkout was dreadfully slow (the same thing written down on three different pieces of paper) and no doubt someone else will have to key it all back in later, but the other customers were all cool, so I was able to get what I needed, despite the power outage.  Yay, @HomeDepot.

Saturday, October 30, 2010

A Threat to Myself

So we finally finished the painting of the downstairs and installed the bookcase, secured it to the wall, filled it with books, and then set (almost) all the clutter from around the house right in front of the bookcase. Only two people have seen this. Well, almost all of it. Anyhow, I took a photo of it. I'm giving myself the month of November to make a dent in it. I'm going to post before and after photos. I worked through an entire basket tonight. I put a bunch of stuff in the burn bin, a bunch more in the recycle bin, and consolidated some into an existing to-sort bin. Unfortunately, that bin isn't in the photo, so on the whole of it, tonight's before and after would look the same. But progress will be made.

On a side note... so we just filled the bookcase with books. Interesting to think how the future will look as more books are delivered online. We'll have less need for bookcases or have to find more interesting things to fill them with.

Friday, July 16, 2010

Mini-vacation

4:59. Cool. I declare the mini-vacation officially over (as I kick back with one last cup of coffee and the latest episode of Futurama) and the weekend officially on. Ben and Lori are napping and Rachel's upstairs on PBSKIDS.ORG.

What a fantastic vacation. As I've looked around in the past and wondered how I was ever going to get anything ever done. I came to the conclusion that you had to wait until your children were a little older and able to entertain themselves.

Ha:

Wednesday, June 10, 2009

Spheres of Influence

As I've been contemplating the best ways to a more simplified life, I realize that I need to apply some GTD principles. Doesn't hurt that I'm reading David Allen's follow-up "Making It All Work" right now, reinforcing what I know and giving me some new ideas.

At work, I have a list of about 71 items. They are projects I'm involved in, projects I'm leading, things I need to think about/research, and the people who work for me or closely with me, or whom I work for. Every day I try to advance as many of those items as possible by spending some time on them. Each time I update an item, I move it to the bottom. That way, the stuff that's not getting my attention bubbles to the top.

I've come to the realization that I need a similar list at home. I use GMail (www.gmail.com) for email, Remember The Milk (www.rememberthemilk.com) for tracking chores, financial stuff and random deal-with-and-delete emails, we use Wet Paint (www.wetpaint.com) to track stuff about our house and we have a Google Doc (docs.google.com) for actual home improvement projects, but I don't have anything to tie it all together.

What I need is a master list, like I have at work.  It won't have the minutae of chores, but it may consolidate the stuff on Wet Paint and Google Docs into a central location where it can be tracked.  But I realized that currently neither actually is comprehensive.  I need a list covers all of my "spheres of influence" in my life at a high level and then dives down deeper from there.  With any luck, it will actually help me to keep more organized, be better prepared and get more accomplished, all while using the computer less.

So far, these are the spheres I've come up with.
  • Immediate Family and Non-Immediate Family
  • Home/House/Residence
  • Church and Church Friends
  • Community
  • Other Friends
  • Car
From there, it would be easy to further segment each of those areas into particular projects, areas of improvement, things and people to remain in touch with and so on and so on.

I'm excited.  I think this will really help.


I've overshot my goal of being in bed reading by a really long shot.

Sunday, April 05, 2009

Home Sizes

Just a random thought... when we bought our little home in California, it was 1,200 square feet.  It had started life at 900 square feet, but someone built a new 1-1/2 car garage out back and then walled in the attached single car garage to add an extra 300 square foot bedroom.  Starting out life, it was a nice size.  And, when we bought it, affordable.  But we watched the people around us expand the size of their houses, and we looked at all the new homes being built and we realized... soon, there would be no more tiny houses, no little starter homes.   By last year, the average new home was 2,800 square feet.  That is a lot of area to clean. 

But, for the first time, the trend has reversed.  The new average home built is 2,300 square feet.  Home builders suggest that the larger homes were becoming unaffordable and that it didn't make sense to continue to make larger and larger homes as familes began getting smaller and smaller in size.

While I've never had the opportunity to really develop any of the techniques, I'm a fan of Sarah Susanka and her "Not So Big" houses books.

Tuesday, January 06, 2009

Craftsman

We've been wanting to add more Craftsman elements to our home. The first result on a search I performed tonight was a great PDF full of examples which turned out to be houses we used to walk by when we lived in California.

Here are some other sites I found tonight with good examples...

Saturday, October 16, 2004

Let it pour...

It's sprinkled a little this evening. At one point, the rain was pretty decent. But, I don't know how serious it is. Should I water, or will it pick back up overnight? I haven't seen rain in months, save one time we saw it out the office window but there was no trace of it by the time we went outside. I don't think it is currently raining, but this house is better insulated than the apartment was, so who knows? I do hear cars driving on wet pavement outside, so that's a good sign.

I feel really proud of myself. For some reason this morning, I looked at the coil of unused wire left over from my dishwasher project just about a year ago. And I stretched it out in the living room and it stretched all the way to the nursery. So I realized that this was in, in fact, enough wire to reach from the power outlets installed in the attic last March when the heater and air conditioner was installed. So I opened up the ceiling fan that we had purchased 14 months ago and laid all the pieces out and started looking over the instructions. It looked simple enough so I started some pre-assembly.

After Lori and the baby woke up, I measured the center of the living room. I drilled a small hole and pushed a garden stake up to see if there was any obstructions. Finding none other than insulation, I held up the mounting box, traced it, and then drilled lots of holes in the ceiling. Then I went out it with a hammer through the plastic and a box cutter through the drywall until I had a big enough opening. I put in a saf-t-brace and a saf-t-box, then I pushed up the wire until it was all looped in the attic and secured it to the box correctly with the pressure clamps. And then I proceeded to hang the ceiling fan. Heavy sucker, the box doesn't say how much, but I'd guess one of the heavier ceiling fans out there.

Part way through, I had to go to Home Depot because it didn't come with bulbs (cheap-os!) and then I came back, finished up assembly and then cut the power to the attic, climbed up and unscrewed the plate on the outlet. At that point, I became really thrilled with how the project was proceeding. The crew had used a plastic box and the outlet itself had open connections. I thought I was going to have to illegally tap into something in wirenuts, but instead, all I had to do was connect my wiring to the outlet. Screwed the panel back on, tacked down the new wiring -- as much as

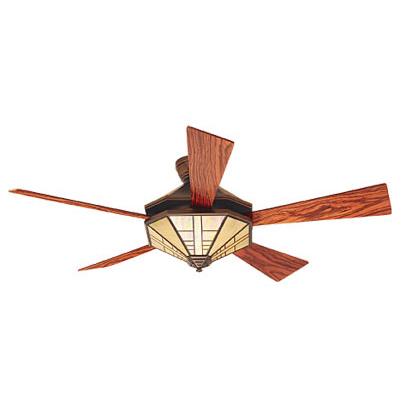
(from home depot website) Posted by Hello

I could reach, since the heater pretty much makes it impossible to get to most of the attic now. Climbed back down, went out and turned the power back on and came in to see the light on and the fan spinning. Success. All told, probably 3-1/2 hours from start to finish, plus 30 minutes of clean-up. Still need to clean some of my tools and put them away, as well as take out the trash, but the living room is back to normal and the fan looks and works great. I am really proud of the job I did.

The fan is a Mission-style five-blade fan with a Tiffany-style lighted base. It gives the entire room a warm golden glow.

Yep, I can hear the rain now and the littlest cat is going crazy running around trying to figure out what it is.